Build Your Own: Bee Hives and Supers
Whether you want to build your own bee hives or just see what's involved, the following is my account of making my own hives and supers including:
Wood Selection
Ripping the Wood
Box Joints
Route the Frame Rest
Priming/Painting the Hive
Wood Selection
Obviously you would never want to use any treated lumber in the making of a bee hive. The chemicals used to treat the wood would not only be harmful to your bees, but also to anyone who consumed the honey produced by a hive made with treated lumber.
For my hives I used pine. Do your homework and check around, the big box stores like Lowes and Home Depot aren't always the cheapest prices out there. Local mills and lumber yards you might not even knew existed in your town usually have great prices!
If you're buying typical dimensional lumber, you can use a single 1x8x8 to make one medium super and a single 1x12x8 to make a single deep hive body.
Ripping the Wood
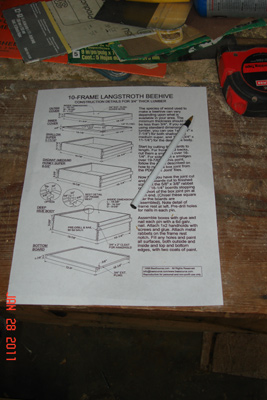
Once you have your lumber home, use the dimensions for Langstroth Hive Plans to mark the width and height of the hive pieces on each board.
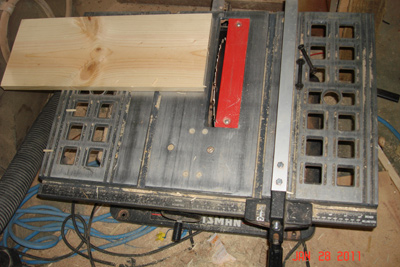
Using a table saw, rip the boards to the desired height first. Next cut the boards to length. Be sure to cut one piece of the hive from the board at at time, and mark the next piece after the first cut. Don't try to be over efficient and do all your marking at once, you'll likely have forgotten to take into account either the blade kerf (width) or human error.
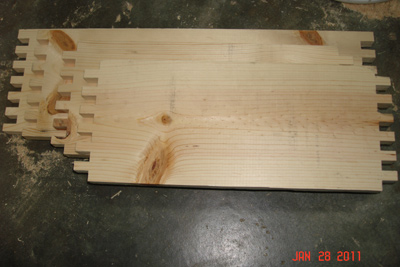
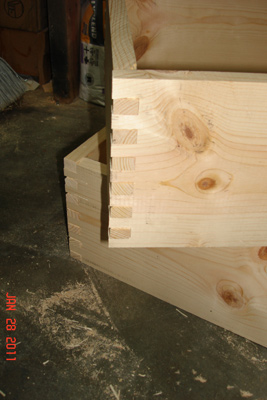
Box Joints
Once you have your wood cut to size, it's time to determine how to join your pieces together with a strong durable joint so that they stand up to Mother Nature, and also the weight of the bees and/or honey.
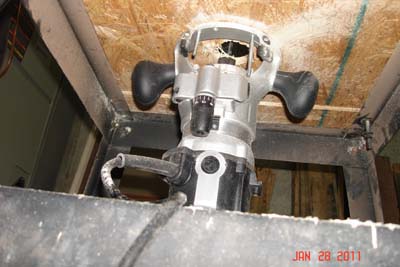
I just happen to have a new variable speed router for Christmas this year, and I was itching to make some box joints, which seems to work out good especially since I don't have any dado blades for my table saw.
At the time, I did not have a router table, so I made one by using the table saw stand, placing a piece of OSB board onto the stand and cutting out holes for the router support.
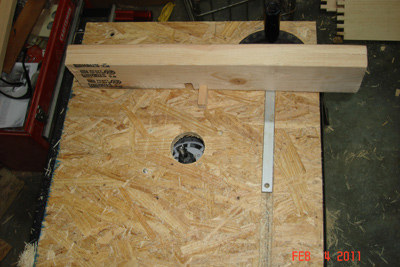
Before I finished, I routed a track into the board for the miter guide.
It isn't perfect, but it works pretty good.
To create a jig, I followed this tutorial.
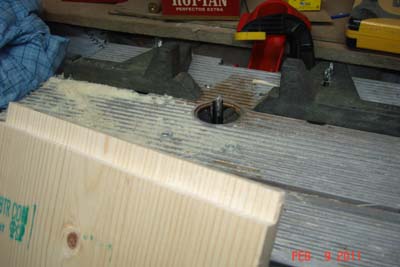
Route the Frame Rest
I chose to save the routing of the frame rest for last, since I couldn't decide how I wanted to start the box joint: with the ends of the box (the part with the frame rest) having a finger joint at the top, or not.
You can see in this picture that i had acquired an actual router table and had remounted my router in the new table. The piece of wood below is a scrap, as I was testing the depth of the bit...turns out it was just about perfect.
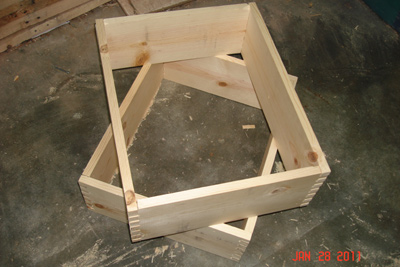
This picture depicts the two options for creating box joints.
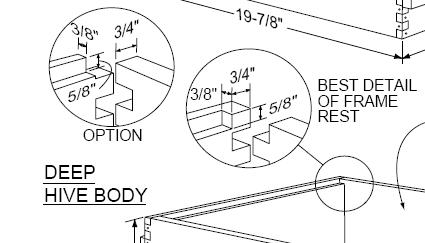
I chose the option on the left. I found that It's easier to route the frame rest with this option, and not have to worry about accidentally routing the top most finger right off the board...but to each his own!
Priming/Paining the Hive
Most beekeepers will paint the outsides of their hives a white color, to help regulate temperature in the hot summer sun, and also to protect the wood from the water/moisture all season long.
I have not painted my hives yet.
I'm thinking about just using linseed oil on the hives since I like the natural look of the pine wood, and the location of my hives will be in partially shaded area during the hottest part of the day.
Wood Selection
Ripping the Wood
Box Joints
Route the Frame Rest
Priming/Painting the Hive
Wood Selection
Obviously you would never want to use any treated lumber in the making of a bee hive. The chemicals used to treat the wood would not only be harmful to your bees, but also to anyone who consumed the honey produced by a hive made with treated lumber.
For my hives I used pine. Do your homework and check around, the big box stores like Lowes and Home Depot aren't always the cheapest prices out there. Local mills and lumber yards you might not even knew existed in your town usually have great prices!
If you're buying typical dimensional lumber, you can use a single 1x8x8 to make one medium super and a single 1x12x8 to make a single deep hive body.
Ripping the Wood
Once you have your lumber home, use the dimensions for Langstroth Hive Plans to mark the width and height of the hive pieces on each board.
Using a table saw, rip the boards to the desired height first. Next cut the boards to length. Be sure to cut one piece of the hive from the board at at time, and mark the next piece after the first cut. Don't try to be over efficient and do all your marking at once, you'll likely have forgotten to take into account either the blade kerf (width) or human error.
Box Joints
Once you have your wood cut to size, it's time to determine how to join your pieces together with a strong durable joint so that they stand up to Mother Nature, and also the weight of the bees and/or honey.
I just happen to have a new variable speed router for Christmas this year, and I was itching to make some box joints, which seems to work out good especially since I don't have any dado blades for my table saw.
At the time, I did not have a router table, so I made one by using the table saw stand, placing a piece of OSB board onto the stand and cutting out holes for the router support.
Before I finished, I routed a track into the board for the miter guide.
It isn't perfect, but it works pretty good.
To create a jig, I followed this tutorial.
Route the Frame Rest
I chose to save the routing of the frame rest for last, since I couldn't decide how I wanted to start the box joint: with the ends of the box (the part with the frame rest) having a finger joint at the top, or not.
You can see in this picture that i had acquired an actual router table and had remounted my router in the new table. The piece of wood below is a scrap, as I was testing the depth of the bit...turns out it was just about perfect.
This picture depicts the two options for creating box joints.
I chose the option on the left. I found that It's easier to route the frame rest with this option, and not have to worry about accidentally routing the top most finger right off the board...but to each his own!
Priming/Paining the Hive
Most beekeepers will paint the outsides of their hives a white color, to help regulate temperature in the hot summer sun, and also to protect the wood from the water/moisture all season long.
I have not painted my hives yet.
I'm thinking about just using linseed oil on the hives since I like the natural look of the pine wood, and the location of my hives will be in partially shaded area during the hottest part of the day.
Comments For This Post: (4) | Post Your Comments! Hide The Comment Form
